Friday, March 29, 2013

Conor's 3rd Birthday

Yesterday, our little guy turned three years old. I find myself stymied that he is already 3, yet he has only been a part of our family for 3 years.

As soon as he woke up, I wished him a happy birthday and told him that he's now three. After a few rounds of "No I'm not! I'm two!" and "Nope. Today is your birthday, now you're three!", he finally came around to identifying himself as three instead of two.

At daycare, his teachers made him a paper crown that he got to decorate with stickers galore. His teachers and friends also sang many renditions of "Happy Birthday" to him; his teacher Olga even sang to him in Russian!

To keep the kids occupied while we waited for the pizza (his requested birthday dinner ... only after his first ideas of "cake" and "chocolate chip pizza" were vetoed), Conor opened his presents from us and the out-of-town contingency. The boy was in hog heaven!!!! The San Diego crew gave him a variety of little items all bundled together in a ball (aka many, many layers) of crepe paper; talk about an entertaining unwrapping experience! He's unwrap a bit and then PLOP, out fell another little item. So fun! His favorite item was the Toy Story top; Eric's and my favorite was the ketchup packet! The Kennewick crew gave him a bike (ok, it started out as a trampoline, but we were concerned about the potential of WWIII breaking out over who got to use it at any given time; we are very grateful for Amazon's rock star exchange policy!) Annika gave him a Jake and the Neverland Pirates toy set (including a talking telescope). Eric and I gave him an InnoTab tablet just like Annika's. Now both kids will remain entertained and quiet (in theory) on our flights to/from Mexico later this year.

Waiting to start the present unwrapping
 
The wad o' crepe papers and goodies

Conor trying out his new bike

Conor opening his tablet
 
Eric trying out the talking telescope
 
After dinner, the kids insisted on going outside and riding their bikes for a bit. It was a gorgeous spring day, how could we possibly say no to that?? Of course, Annika wanted a bike without pedals (like Conor's bike) and Conor wanted a horn on his bike (like Annika's bike), so they wound up swapping back and forth the entire time we were outside.

And away we go!
(Notice he's wearing pants again ... we take the victories we can get!)

One of many bike swaps
 
On-the-go kiddos!
 
After bikes, it was cake time!! All-in-all, our sweet little boy seemed to have a wonderful day and is now catching on to the excitement of celebrating birthdays.

Taking in the view as we sang "Happy Birthday"
 
Fork schmork!
 

Wednesday, March 27, 2013

March 2013 Daring Bakers Challenge

It's baking challenge reveal day! And, boy, am I glad that I have a reminder on my phone's calendar to keep me on top of things. I would have completely forgotten to post about this month's Daring Bakers challenge had it not just beeped at me.

This month, we were tasked with incorporating at least one vegetable into a dessert. As soon as I read the challenge description, I knew what I was going to make. When I was a kid, my mom used to make a really yummy chocolate cake that had zucchini tucked inside for added moisture.

I called my mom and asked for the recipe. When she called me back with it, I was folding laundry and really didn't have any writing implements at hand. I ran to the kids' art bin and found a piece of brown construction paper and a red crayon. Perfect! I scribbled down the recipe and half considered keeping it in that format, but decided it would be more prudent to write it out in longhand for future use. Darn you, logic, you won again!

This cake's origins are a bit unclear. My mom couldn't recall if she got the recipe from her friend Mary or if her friend Mary gave the recipe to her. Either way, it is now in my possession and because my mom gave it to me, I'm taking over the naming rights.

I baked the cake this weekend. Much to our niece Emily's amazement, the kids and I had this baby out of the oven and on a cooling rack by 7:30 AM! (Welcome to life with young children!)

I figured we could use this cake for Conor's actual birthday (tomorrow!!!) and then the fancier cake for his family gathering on Sunday (aka Easter). Because we're saving the cake until tomorrow, please imagine the cake below is sliced and has a lovely dusting of powdered sugar on top!

I almost forgot to take a picture of the cake, so had to unwrap it from its Saran and foil coverings ... hence the less than grand picture.


Nana's Chocolate Zucchini Cake
 
Ingredients
  • 1 c. brown sugar
  • ½ c. white sugar
  • ½ c. butter
  • ½ c. vegetable oil
  • 3 eggs
  • 1 tsp. vanilla
  • ½ c. buttermilk
  • 2 ½ c. flour
  • ½ tsp. all spice
  • ½ tsp. cinnamon
  • ¼ tsp. ground clove
  • ½ tsp. salt
  • 2 tsp. baking soda
  • 4 T. cocoa powder
  • 2 zucchini (grated = 2 c.)
  • 1 c. chocolate chips
Directions
  1. Preheat oven to 325F.
  2. In mixer bowl, cream together sugars, butter, and oil.
  3. Add eggs, vanilla, and buttermilk.
  4. Add flour, all spice, cinnamon, clove, salt, baking soda, and cocoa powder.
  5. Fold in zucchini.
  6. Pour batter into greased bundt pan.
  7. Sprinkle chocolate chips on top of batter.
  8. Bake at 325 for 45 minutes.
  9. Cool in pan for 10 minutes, then invert cake onto cooling rack.
  10. Sift powdered sugar over cake before slicing.
 Ruth from Makey-Cakey was our March 2013 Daring Bakers’ challenge host. She encouraged us all to get experimental in the kitchen and sneak some hidden veggies into our baking, with surprising and delicious results!

  1. 

Tuesday, March 26, 2013

My Easter Apron

Thanks to the tendonitis in my elbow, I haven't been able to knit for months and months. To fill the creative void and not annoy my elbow, I've returned to sewing.

My most recent sewing project was inspired by a recent outing to Pacific Fabrics. (Side note: I love, love, love this fabric store!!) While browsing through the table of clearance fabrics, I came across an adorabe yellow Easter fabric. I knew I needed to transform it into a cute apron for Easter. Before leaving the store, the wonderful sales rep pointed me toward a few apron patters, and I zeroed on the "Sassy Little Apron" pattern by Cabbage Rose Quilts.

As I progressed through this project, I became painfully aware of the fact I have no (insert explative) clue where I stashed my little box of sewing machine feet. I mean NO IDEA. I can tell you exactly what the box looks like and what's in it ... just can't tell you (or me) where it is. Driving me nuts!

But I digress...

It took a few days of cutting and sewing to achieve my final product, but it was worth it! I am all ready to be the hostess with the mostess on Easter Sunday, which is doubling as Conor's 3rd birthday party with our extended family members. Hmmm... I wonder if I should whip up a birthday-themed apron for that portion of the day. ;)

And me being, well ... me, I decided the kids needed Easter aprons, too! Annika's is done (she opted for no ruffle and a single fabric apron, which made the process that much faster). I haven't started Conor's yet, but because his will be a chef apron (basically a rectangle with a pocket and ties), I should be able to make it pretty darned fast.

The refrigerator modeling my Easter apron.

Thursday, March 21, 2013

St. Patrick's Day Tie Dye

To make sure our kids had something green to wear on St. Patrick's Day, I decided we should tie dye shirts. (If St. Patrick had been a hippie, he TOTALLY would have worn the shirts we made!!)

I figured it would be a fun project to do together and I was completely right! 

One a recent trip to a local fabric store, I asked a sales rep if she had any fabric dye and explained the project I had in mind. She walked me to the aisle that had tie dye kits ... brilliant! Everything we'd need in one little box. 

On the Thursday before St. Patrick's Day, I donned some gloves, soaked the shirts in the ash powder/water solution, and then got to work twisting, rubber banding, and marbling the shirts. Once the grunt work was done, I mixed up the two squeeze bottles of dye (light green and dark green), and then invited the kids (one by one) to help me put the dye on the shirts. They decided which color went where and how much color to apply. 

Conor LOVED the squirting processes and insisted on doing most of it himself. Annika was a bit more artistic in her approach, but still wasn't shy about using the colors. Valeria (Annika's little BFF who was over for a play date) preferred playing princess, so didn't wind up making a shirt ... oh well!)

After applying the dye, the shirts had to sit in plastic bags for 24 hours. Once that milestone was reached, I rinsed the shirts in cold water and then washed/dried them. SUCCESS!! 

I love it when a project seems simple and winds up being so. Too many projects seem like they should be easy but wind up taking a lot longer and requiring a lot more energy than expected. I'd definitely tie dye with the kids again and might even venture into using more colors!

Marbles make the circle patterns

Soaking, soaking, soaking

Finished product!

Wednesday, March 20, 2013

All ready for class pictures

Today is Annika's class picture day. I had a moment of "oh my, she's growing up so fast" when I realized this is her last class picture before she starts wearing uniforms to school. When she starts kindergarten in the fall, she'll be all dudded up in her school uniform.

Pardon me while I wipe a tear away from my eye...

While doing her hair this morning, I mentioned to Annika how in her next class picture, she'll be in a uniform. She let out a rather enthusiastic "HURRAY!!" All I could think was, "Sure ... you say that now." ;)

Our big kid ... today preschool... tomorrow college. (I need a tissue!)

Annika all ready for class pictures!

Tuesday, March 19, 2013

Dinner Manners

Last night during dinner:

Conor: "Mama, I want more milt." (Note: I spelled according to his pronunciation.)

Annika: "Conor! You forgot the magic word!"

Conor: "Abracadabra zap!!" 

(Insert sounds of Eric and me laughing here.)

Annika: "No! You were supposed to say, 'I want more milk, please.'"

Conor: "But it's MY milt!!"

Fear not! I jumped in (while gasping for air) to explain to Conor that Annika was just trying to demonstrate the proper way to ask for milk and that she wasn't really trying to usurp his milk. Meanwhile, poor Annika had no clue why Conor was miffed at her.

Miss Manners, signing off...

Monday, March 11, 2013

Newborn Photography: Nathan

Our wonderful friends, the Hoglunds, recently had their second son, Nathan. Before Rachel had Nathan, I asked her if it would be OK for me to practice my newborn photography skills once the baby was born. Fortunately, Rachel was enthusiastic about the idea.

Last weekend, I packed up the camera bag and headed to their house to work on my photography skills ... ok, the truth was it mostly a chance for me to "ooh" and "ahh" over a two-week old baby. The photo session was just my cover story. ;)

Nathan is an incredibly sweet baby. He was very cooperative and the perfect subject. In fact, he slept the vast majority of the time... even when his big brother Liam (who is 6 days younger than Conor) serenaded us with a few drum solos!

I did the entire shoot using my 50 mm prime lens and took advantage of their house's exceptional natural light.   They have a very large window with eastern exposure, which was ideal for our morning-hours shoot, and we had a gorgeous morning here in Seattle. The planets truly aligned for an ideal photo setup.

A special thanks to the Hoglund Four for letting me invade your home for an hour!!

The Hoglunds Four

Future musician
Nathan and Eric

Tiny toes

Rachel and Nathan

Sweet little Nathan


Thursday, March 7, 2013

Mud Boy Returns

Just in case you thought Conor's muddy face shown recently was a unique instance, I decided to prove that, in fact, it wasn't. Oour boy LOVES to play in puddles and with the wet weather we've had lately, he's come home looking like this more often than not. On an up note, we sure know he's having fun at daycare! :)

The kids in his class love the mud puddles so much that their teachers posted a sign on the classroom door that asks parents to bring LOTS of extra clothes, including pants and socks, for the kids to wear post-puddle jumping.

(Please ignore the funky color tone... I used my phone's camera to snap these pics.)


Wednesday, March 6, 2013

Conor Channeling Bill Cosby

Conor is practicing being 3. He's very good at it, in fact.

We are working hard to raise children who are self sufficient, able to make decisions, and know they are capable beings. This is a process. It is not a quick trip. No, no, no. In fact, it is more like walking across the country ... a few times. (Run, Forrest, Run!) (5 points if you get that pseudo movie reference.)

Lately, Conor has been asserting more independence, which is great. That said, he's a bit schizo (and I write that in the most loving way possible) in asserting it. He constantly reminds us of Bill Cosby's skit about Adam and Eve.... mostly the Eve part: "Come here, come here, come here. Go away, go away, go away. Come here, come here, come here. Go away, go away, go away." (If you are so young or unaware of the great Bill Cosby's skit about The Apple, click this link and listen: http://www.youtube.com/watch?v=qs9WEExFT0g)

Instead of the "Come here, go away" dynamic, Conor has the "I can do it, I need help" dynamic.

Me: Conor, here's your pancake. Would you like me to cut it for you?
Conor: No, I do it myself.
Me: OK. Not even a little help?
Conor: No, I do it.
(At this point, he realizes that he might actually need a little help.)
Conor: Mama, I need help.
Me: Sure, I can help. (Taking the knife to help.)
Conor: NO!!! I DO IT!
(At this point, he realizes that he, in fact, still needs help.)

Conor: Mama, I need help.
Me: You sure? OK. (Taking the knife to help.)
Conor: NO!!! I DO IT!
(Repeat.... a lot)

This isn't just a pancake occurrence. Nope. It's a just about everything occurrence.

Ahh.... to be almost 3.

(Stop, Forrest, Stop!)

Salted Caramel Brownies

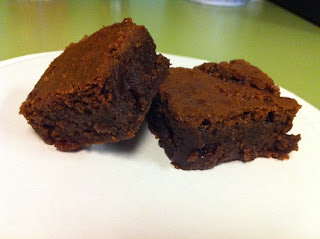
A few weeks ago, Eric ran across a recipe for salted caramel brownies. Ironically, it was posted on one of my favorite food blogs (Smitten Kitchen). Of course, seeing the recipe made me want to give it a go, but time was a bit short, so I didn't quite get around to it. Part of the reason for the delay was finding time to not only make the brownies, but also the homemade salted caramel that goes into them.

Last night, however, was the night. Annika had a play date at her friend Valeria's house, which gave me a bit of extra time to work on the brownies. I made the caramel and then picked up Annika while it cooled ... multi-tasking, baby!!

Because I made a double batch (knowing I'd take the brownies to work) I used a 9x13 pan instead of the recommended 8x8 pan. I quickly realized that putting the caramel on a plate to cool wasn't going to be an ideal situation; the risk of a "caramel overboard" situation was pretty great; I had visions of caramel slipping off of the plate and all over the freezer ... I also had visions of me chiseling the caramel out of the freezer ... and snacking on it. (How sad is that???) To avoid that embarrassing (yet probably fairly tasty) scenario, I opted to verrrrrrry carefully slide the parchment from the plate to a pie dish; the extra-high sides were exactly what I needed.  Glad I went with plan B!

After picking up Annika and putting Conor to bed, Annika and I made the brownie batter together. She had a great time stirring the ingredients as I dumped them into the bowl. That said, her favorite part was licking the spatula when all was said and done! :)

A few things I noticed, greasing the parchment that the caramel cools on is a must. I lined my baking pan with a two-way of (greased) parchment paper and am very glad that I did. The brownies took about 15-20 minutes longer to bake than the original recipe called for, but that probably has something to do with the fact I doubled the recipe and had a much bigger pan in the oven. Finally, when sprinkling the remaining caramel pieces on top of the brownie batter, don't put the pieces overly close to the edge ... they created caramel crunch and enveloped the edges of the parchment a bit.

Oh my, but are these babies divine! I mean DEEEE-VINE!!! They are gooey and not too sweet. I'm not normally a huge salted caramel fan, but because the salt wasn't overpowering, I'm giving this recipe a huge thumbs up.

If you decide to try the recipe, heed the advice from Smitten Kitchen.... freeze the brownies for a bit before trying to cut them. I tried cutting them this morning without freezing them and it was fairly tricky. After 10-15 minutes in the freezer, they cut much more easily.


Salted Caramel Brownies (courtesy of Smitten Kitchen)

Caramel
1/2 cup granulated sugar
4 tablespoons unsalted butter (or salted, but then ease up on the sea salt)
Heaped 1/4 teaspoon flaky sea salt (or 1/8 teaspoon table salt, more to taste)
3 tablespoons heavy cream

Brownie
3 ounces (85 grams) unsweetened chocolate, roughly chopped
1 stick (4 ounces or 115 grams) unsalted butter, plus extra for pan
1 cup (200 grams) granulated sugar
2 large eggs
1 teaspoon (5 ml) vanilla extract
Heaped 1/4 teaspoon flaky sea salt or 1/8 teaspoon table salt
2/3 cup (85 grams) all-purpose flour

Make caramel: Set a square of parchment paper over a medium-sized plate. Lightly butter or coat the parchment with a spray oil, just as an added security measure.

In a medium, dry saucepan over medium-high heat, melt your sugar; this will take about 5 minutes, stirring if necessary to break up large chunks. By the time it is all melted, if should be a nice copper color; if not, cook until it is. Remove from heat and stir in butter. It may not incorporate entirely but do your best. Stir in cream and salt and return saucepan to the stove over medium-high heat, bringing it back to a simmer and melted again any sugar that solidified. Cook bubbling caramel for a few minutes more, until it is a shade darker.

Pour out onto parchment-covered plate and transfer plate to your freezer. Freeze until solidified, which can take anywhere from 20 to 30 minutes in a decent freezer to 40 minutes in my terrible one.

Meanwhile, or when your caramel is almost firm, make your brownies: Heat oven to 350°F. Line an 8×8-inch square baking pan with parchment, extending it up two sides. Butter the parchment or spray it with a nonstick cooking spray.

In a medium heatproof bowl over gently simmering water, melt chocolate and butter together until only a couple unmelted bits remain. Off the heat, stir until smooth and fully melted. You can also do this in the microwave in 30-second bursts, stirring between each. Whisk in sugar, then eggs, one at a time, then vanilla and salt. Stir in flour with a spoon or flexible spatula.

Assemble brownies: When caramel is firm, remove it from the freezer and chop it into rough 1-inch squares. Gently fold all but a small amount of caramel bits into batter. Scrape batter into prepared pan, spreading until mostly even. Scatter remaining caramel bits on top. Bake in heated oven for 30 minutes, until a toothpick inserted into the center comes out clean.

Cool thoroughly — a process that can be hastened in the freezer, which will also produce cleaner cuts — and cut into squares or other desired shapes.