
Conor is practicing being 3. He's very good at it, in fact.
We are working hard to raise children who are self sufficient, able to make decisions, and know they are capable beings. This is a process. It is not a quick trip. No, no, no. In fact, it is more like walking across the country ... a few times. (Run, Forrest, Run!) (5 points if you get that pseudo movie reference.)
Lately, Conor has been asserting more independence, which is great. That said, he's a bit schizo (and I write that in the most loving way possible) in asserting it. He constantly reminds us of Bill Cosby's skit about Adam and Eve.... mostly the Eve part: "Come here, come here, come here. Go away, go away, go away. Come here, come here, come here. Go away, go away, go away." (If you are so young or unaware of the great Bill Cosby's skit about The Apple, click this link and listen: http://www.youtube.com/watch?v=qs9WEExFT0g)
Instead of the "Come here, go away" dynamic, Conor has the "I can do it, I need help" dynamic.
Me: Conor, here's your pancake. Would you like me to cut it for you?
Conor: No, I do it myself.
Me: OK. Not even a little help?
Conor: No, I do it.
(At this point, he realizes that he might actually need a little help.)
Conor: Mama, I need help.
Me: Sure, I can help. (Taking the knife to help.)
Conor: NO!!! I DO IT!
(At this point, he realizes that he, in fact, still needs help.)
Conor: Mama, I need help.
Me: You sure? OK. (Taking the knife to help.)
Conor: NO!!! I DO IT!
(Repeat.... a lot)
This isn't just a pancake occurrence. Nope. It's a just about everything occurrence.
Ahh.... to be almost 3.
(Stop, Forrest, Stop!)
Wednesday, March 6, 2013

Salted Caramel Brownies
A few weeks ago, Eric ran across a recipe for salted caramel brownies. Ironically, it was posted on one of my favorite food blogs (Smitten Kitchen). Of course, seeing the recipe made me want to give it a go, but time was a bit short, so I didn't quite get around to it. Part of the reason for the delay was finding time to not only make the brownies, but also the homemade salted caramel that goes into them.
Last night, however, was the night. Annika had a play date at her friend Valeria's house, which gave me a bit of extra time to work on the brownies. I made the caramel and then picked up Annika while it cooled ... multi-tasking, baby!!
Because I made a double batch (knowing I'd take the brownies to work) I used a 9x13 pan instead of the recommended 8x8 pan. I quickly realized that putting the caramel on a plate to cool wasn't going to be an ideal situation; the risk of a "caramel overboard" situation was pretty great; I had visions of caramel slipping off of the plate and all over the freezer ... I also had visions of me chiseling the caramel out of the freezer ... and snacking on it. (How sad is that???) To avoid that embarrassing (yet probably fairly tasty) scenario, I opted to verrrrrrry carefully slide the parchment from the plate to a pie dish; the extra-high sides were exactly what I needed. Glad I went with plan B!
After picking up Annika and putting Conor to bed, Annika and I made the brownie batter together. She had a great time stirring the ingredients as I dumped them into the bowl. That said, her favorite part was licking the spatula when all was said and done! :)
A few things I noticed, greasing the parchment that the caramel cools on is a must. I lined my baking pan with a two-way of (greased) parchment paper and am very glad that I did. The brownies took about 15-20 minutes longer to bake than the original recipe called for, but that probably has something to do with the fact I doubled the recipe and had a much bigger pan in the oven. Finally, when sprinkling the remaining caramel pieces on top of the brownie batter, don't put the pieces overly close to the edge ... they created caramel crunch and enveloped the edges of the parchment a bit.
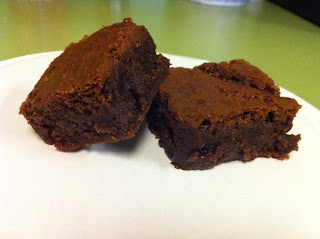
Oh my, but are these babies divine! I mean DEEEE-VINE!!! They are gooey and not too sweet. I'm not normally a huge salted caramel fan, but because the salt wasn't overpowering, I'm giving this recipe a huge thumbs up.
If you decide to try the recipe, heed the advice from Smitten Kitchen.... freeze the brownies for a bit before trying to cut them. I tried cutting them this morning without freezing them and it was fairly tricky. After 10-15 minutes in the freezer, they cut much more easily.
Last night, however, was the night. Annika had a play date at her friend Valeria's house, which gave me a bit of extra time to work on the brownies. I made the caramel and then picked up Annika while it cooled ... multi-tasking, baby!!
Because I made a double batch (knowing I'd take the brownies to work) I used a 9x13 pan instead of the recommended 8x8 pan. I quickly realized that putting the caramel on a plate to cool wasn't going to be an ideal situation; the risk of a "caramel overboard" situation was pretty great; I had visions of caramel slipping off of the plate and all over the freezer ... I also had visions of me chiseling the caramel out of the freezer ... and snacking on it. (How sad is that???) To avoid that embarrassing (yet probably fairly tasty) scenario, I opted to verrrrrrry carefully slide the parchment from the plate to a pie dish; the extra-high sides were exactly what I needed. Glad I went with plan B!
After picking up Annika and putting Conor to bed, Annika and I made the brownie batter together. She had a great time stirring the ingredients as I dumped them into the bowl. That said, her favorite part was licking the spatula when all was said and done! :)
A few things I noticed, greasing the parchment that the caramel cools on is a must. I lined my baking pan with a two-way of (greased) parchment paper and am very glad that I did. The brownies took about 15-20 minutes longer to bake than the original recipe called for, but that probably has something to do with the fact I doubled the recipe and had a much bigger pan in the oven. Finally, when sprinkling the remaining caramel pieces on top of the brownie batter, don't put the pieces overly close to the edge ... they created caramel crunch and enveloped the edges of the parchment a bit.
Oh my, but are these babies divine! I mean DEEEE-VINE!!! They are gooey and not too sweet. I'm not normally a huge salted caramel fan, but because the salt wasn't overpowering, I'm giving this recipe a huge thumbs up.
If you decide to try the recipe, heed the advice from Smitten Kitchen.... freeze the brownies for a bit before trying to cut them. I tried cutting them this morning without freezing them and it was fairly tricky. After 10-15 minutes in the freezer, they cut much more easily.

Salted Caramel Brownies (courtesy of Smitten Kitchen)
Caramel
1/2 cup granulated sugar
4 tablespoons unsalted butter (or salted, but then ease up on the sea salt)
Heaped 1/4 teaspoon flaky sea salt (or 1/8 teaspoon table salt, more to taste)
3 tablespoons heavy cream
4 tablespoons unsalted butter (or salted, but then ease up on the sea salt)
Heaped 1/4 teaspoon flaky sea salt (or 1/8 teaspoon table salt, more to taste)
3 tablespoons heavy cream
Brownie
3 ounces (85 grams) unsweetened chocolate, roughly chopped
1 stick (4 ounces or 115 grams) unsalted butter, plus extra for pan
1 cup (200 grams) granulated sugar
2 large eggs
1 teaspoon (5 ml) vanilla extract
Heaped 1/4 teaspoon flaky sea salt or 1/8 teaspoon table salt
2/3 cup (85 grams) all-purpose flour
3 ounces (85 grams) unsweetened chocolate, roughly chopped
1 stick (4 ounces or 115 grams) unsalted butter, plus extra for pan
1 cup (200 grams) granulated sugar
2 large eggs
1 teaspoon (5 ml) vanilla extract
Heaped 1/4 teaspoon flaky sea salt or 1/8 teaspoon table salt
2/3 cup (85 grams) all-purpose flour
Make caramel: Set a square of parchment paper over a medium-sized plate. Lightly butter or coat the parchment with a spray oil, just as an added security measure.
In a medium, dry saucepan over medium-high heat, melt your sugar; this will take about 5 minutes, stirring if necessary to break up large chunks. By the time it is all melted, if should be a nice copper color; if not, cook until it is. Remove from heat and stir in butter. It may not incorporate entirely but do your best. Stir in cream and salt and return saucepan to the stove over medium-high heat, bringing it back to a simmer and melted again any sugar that solidified. Cook bubbling caramel for a few minutes more, until it is a shade darker.
Pour out onto parchment-covered plate and transfer plate to your freezer. Freeze until solidified, which can take anywhere from 20 to 30 minutes in a decent freezer to 40 minutes in my terrible one.
Meanwhile, or when your caramel is almost firm, make your brownies: Heat oven to 350°F. Line an 8×8-inch square baking pan with parchment, extending it up two sides. Butter the parchment or spray it with a nonstick cooking spray.
In a medium heatproof bowl over gently simmering water, melt chocolate and butter together until only a couple unmelted bits remain. Off the heat, stir until smooth and fully melted. You can also do this in the microwave in 30-second bursts, stirring between each. Whisk in sugar, then eggs, one at a time, then vanilla and salt. Stir in flour with a spoon or flexible spatula.
Assemble brownies: When caramel is firm, remove it from the freezer and chop it into rough 1-inch squares. Gently fold all but a small amount of caramel bits into batter. Scrape batter into prepared pan, spreading until mostly even. Scatter remaining caramel bits on top. Bake in heated oven for 30 minutes, until a toothpick inserted into the center comes out clean.
Cool thoroughly — a process that can be hastened in the freezer, which will also produce cleaner cuts — and cut into squares or other desired shapes.
Wednesday, February 27, 2013
February 2013 Daring Bakers Challenge: Crisp Crackers and Flatbreads
It is funny how some months fly by so fast that I have to scramble to complete the month's Daring Bakers challenge. This month was the antithesis of those months. I completed this month's challenge on the 2nd or 3rd. The reason behind my speedy completion? There were actually two reasons. First, the recipes were pretty fast to complete. Second, the recipes didn't require ingredients that were hard to find ... because they were all in our kitchen. Can't complain about that!
This month, we were tasked with making crisp crackers and/or flatbread. Being the overachiever that I am, I decided to make one of each. I wound up making homemade graham crackers and crisp rosemary flatbread.
It is no secret that I adore the Smitten Kitchen food blog. That gal is a culinary god... you'll definitely agree once you see how small her kitchen is! I chose her graham cracker recipe and am so glad that I did. They turned out amazingly well. The shocker? No graham flour was used. I read the recipe 6-7 times before I believed it. These little yummy treats were flavorful, crunchy, and topped with cinnamon sugar. (Eric said they were too crispy and nuked them for a few seconds before eating them ... what can I say? I married a guy who likes stale graham crackers. I don't get it either!) ;)
Next, I tackled the the Smitten Kitchen crisp rosemary flatbread recipe. I was less in love with the results of this adventure. The crisp flatbread turned out less crisp and more dense than I expected; imagine almost like a pita texture. I don't know if I did something wrong or simply didn't roll out the dough thin enough. Either way, I wouldn't call this flatbread crisp.
The other issue I had was I didn't have fresh rosemary on hand; instead I used dry. Not wanting to overpower the bread with rosemary, I went too cautious and under rosemary-ed the dough. Its flavor was a bit flat (no pun intended) and lacked the lovely punch of rosemary flavor I'd hoped for. I think I'll try this recipe again, but with thinner dough and fresh rosemary.
Can't wait to see what is in store for March's challenge!!
Sarah from All Our Fingers in the Pie was our February 2013 Daring Bakers’ host and she challenges us to use our creativity in making our own Crisp Flatbreads and Crackers!
This month, we were tasked with making crisp crackers and/or flatbread. Being the overachiever that I am, I decided to make one of each. I wound up making homemade graham crackers and crisp rosemary flatbread.
It is no secret that I adore the Smitten Kitchen food blog. That gal is a culinary god... you'll definitely agree once you see how small her kitchen is! I chose her graham cracker recipe and am so glad that I did. They turned out amazingly well. The shocker? No graham flour was used. I read the recipe 6-7 times before I believed it. These little yummy treats were flavorful, crunchy, and topped with cinnamon sugar. (Eric said they were too crispy and nuked them for a few seconds before eating them ... what can I say? I married a guy who likes stale graham crackers. I don't get it either!) ;)
 |
| Graham crackers |
Next, I tackled the the Smitten Kitchen crisp rosemary flatbread recipe. I was less in love with the results of this adventure. The crisp flatbread turned out less crisp and more dense than I expected; imagine almost like a pita texture. I don't know if I did something wrong or simply didn't roll out the dough thin enough. Either way, I wouldn't call this flatbread crisp.
The other issue I had was I didn't have fresh rosemary on hand; instead I used dry. Not wanting to overpower the bread with rosemary, I went too cautious and under rosemary-ed the dough. Its flavor was a bit flat (no pun intended) and lacked the lovely punch of rosemary flavor I'd hoped for. I think I'll try this recipe again, but with thinner dough and fresh rosemary.
 |
| Crisp(ish) rosemary flatbread |
Can't wait to see what is in store for March's challenge!!
Sarah from All Our Fingers in the Pie was our February 2013 Daring Bakers’ host and she challenges us to use our creativity in making our own Crisp Flatbreads and Crackers!
Monday, February 25, 2013
A Weekend of Homemade
Looking back on this past weekend, I'm pretty impressed with how much "homemade" we achieved.
First, I finished Annika's new nightgown. When I began the project early last week, I figured it would be a snap to whip up... and it should have been, but I couldn't get my serger to work properly. No matter how I changed the tension dials, the only tension that changed was my own. I had to walk away on a few occasions because my fun project wasn't feeling very fun. Finally, I went to the store that sold it to me and asked for help. A marvelous woman took a look at my machine, pointed out a few things that needed to be corrected and then played with the tension dials. Within a few minutes, she tamed my serger and it was creating gorgeous stitches. She also pointed out that the settings she landed on are pretty wonky, which means my serger is due for some maintenance. This week, it'll go in for some TLC.
While finishing Annika's nightgown was a huge accomplishment (which also resulted in us being able to use our kitchen table again), it wasn't the only completed project of the weekend. Eric and I swapped out the worn out faucet in our downstairs bathroom. (Sorry, no pictures are available.) The hot water handle had a bit of an issue in that if we turned it off too far, the water would turn back on. It's been like this for quite some time and I decide it was time for a change. After a lot of elbow grease, a few scraped knuckles, a bit of head scratching, lots of tools, and some plumbers dope (yes, I do know what that is now!), we pulled out the old hardware and replaced it with the new. So thrilled with the final results!!
On Saturday, I was struck with the idea that Annika and I should try making homemade butter. I'd picked up a quart of whipping cream so I could make frosting for a cake, but knew there would be plenty left for other purposes (Oh yeah, there's another project .. I made a chocolate cake with chocolate and peanut butter ganache topping for my co-workers' birthdays). Thanks to a quick Internet search, I found that a blog that said we only needed was some whipping cream and a jar that had a good seal. Done and done! Unfortunately, I was much more psyched about the project than Annika was, so after about 5-6 shakes, she was ready to work on solving her mazes and I was left getting a great upper body workout. But, after a lot of shaking, we went from having whipping cream to whipped cream, to a lump of stuff, to butter and buttermilk. Little did I realize when we started that we'd have two final products: homemade butter and homemade buttermilk (which I used to make pancakes for the kids Sunday morning)!
First, I finished Annika's new nightgown. When I began the project early last week, I figured it would be a snap to whip up... and it should have been, but I couldn't get my serger to work properly. No matter how I changed the tension dials, the only tension that changed was my own. I had to walk away on a few occasions because my fun project wasn't feeling very fun. Finally, I went to the store that sold it to me and asked for help. A marvelous woman took a look at my machine, pointed out a few things that needed to be corrected and then played with the tension dials. Within a few minutes, she tamed my serger and it was creating gorgeous stitches. She also pointed out that the settings she landed on are pretty wonky, which means my serger is due for some maintenance. This week, it'll go in for some TLC.
 |
| Annika modeling her new nightgown |
On Saturday, I was struck with the idea that Annika and I should try making homemade butter. I'd picked up a quart of whipping cream so I could make frosting for a cake, but knew there would be plenty left for other purposes (Oh yeah, there's another project .. I made a chocolate cake with chocolate and peanut butter ganache topping for my co-workers' birthdays). Thanks to a quick Internet search, I found that a blog that said we only needed was some whipping cream and a jar that had a good seal. Done and done! Unfortunately, I was much more psyched about the project than Annika was, so after about 5-6 shakes, she was ready to work on solving her mazes and I was left getting a great upper body workout. But, after a lot of shaking, we went from having whipping cream to whipped cream, to a lump of stuff, to butter and buttermilk. Little did I realize when we started that we'd have two final products: homemade butter and homemade buttermilk (which I used to make pancakes for the kids Sunday morning)!
 |
| Butter! |
 |
| Buttermilk |
Thanks to my cousin (Tonya) introducing me to the wondrous world of online craft classes, I enrolled in a free "perfect pizza" class led by the amazing Peter Reinhart... a well-known bread maker. So, I decided to make homemade pizza for dinner ... which, of course, required homemade pizza dough. One of Peter's tips was to make the dough a day or two before you need it, so the glutens have time to develop. We'll make pizza for dinner tonight ... stay tuned for a review of the final results.
 |
| To quote Homer Simpson: "DOUGH!" |
Last, and certainly not least, I got it in my head that the kids needed crowns that would last more than 5 minutes. Typically when they want to play dress up, I'd make them paper crowns. Paper being paper and the kids being kids resulted in ripped crowns and frowny kids. Enough was enough ... our kids deserve the best, right? My mission was to sew them some fabric crowns that had a chance of living past the afternoon.
Once again, I did a quick Internet search, found a great blog that included instructions and a template, and I went to work. I learned quite a bit about the process making Annika's crown and applied a few tweaks when constructing Conor's crown. The biggest tip I figured out was to cut the interfacing slightly smaller than the fabric so it doesn't make the inside fabric quite so tight. Plus, my serger proved to be the perfect tool for finishing the bottom edges of the crowns - once again, thank you to the marvelous woman at the sewing store! I was incredibly pleased with the final results and the kids love them. Win - win!
 |
| Our prince and princess |
 |
| Ta-da! You can't really tell in this photo, but each crown has two fabrics: one on the inside and one on the outside |
Thursday, February 21, 2013
Introducing...Mud Boy!
Here in Seattle, it rains. Sometimes, it rains a lot. That doesn't stop us from living our lives. We don't huddle in the corners waiting for brief glimpses of the sun to have fun. Oh no! Quite the contrary, in fact. We embrace our wet environment and take it for what it is ... a never-ending resource for muddy puddles!!!
When I picked up Conor from day care yesterday, he and his friends were happily playing in a muddy puddle. Conor was armed with a shovel and bucket and he happily "tooped" water from the downspout's runoff into his bucket. As he forged ahead with his project, his friends decided jumping into the same puddle was loads of fun!! The kids took turns finding the highest point and then launching themselves into the several-inches deep puddle... cackling with glee the entire time. If I had my boots on, I probably would have joined them. :)
His yellow rain suit (Tuffo Muddy Buddy) is truly amazing!!! If you have little ones and rain in your life, I HIGHLY recommend them. Conor's layers under the suit were completely dry (aside from the parts poking out). Not only do they work well, they're quite durable; the suit shown below is a hand-me-down suit from Annika!
I couldn't help but snap a few pictures of Conor before peeling off his layers of clothing, dirt, water, and unidentified grime. Yes, I'm the cruel mother who wouldn't let her kid get into the van until I took a few pictures. Fortunately, Conor was having fun, so he didn't feel the need to call CPS. ;)
Ladies and gentlemen, I give you Mud Boy!
 |
| This is what childhood in Seattle is all about |
 |
| Mud ... head to toes |
 |
| I asked Conor to show me his muddy face ... this is what I got |
 |
| This is one of my new favorite pictures of Conor ! |
Tuesday, February 19, 2013
Island Getaway
Eric's parents recently got a new TV, which means Eric recently got a "Umm... can you please come up to the island and help us get it set up" request from his parents. We were happy to oblige considering going up to their place is always a fun outing for us.
This being a three-day weekend, it was the perfect opportunity to spend a night on Whidbey and soak up some island-paced fun. As we packed up the van Sunday morning, Eric looked at me and said, "Do you realize this is the first time in over 5 years that we've packed for the island and haven't packed the travel crib??" We felt so liberated and oddly underpacked.
We easily made the ferry and as we waited to leave the dock, Annika proclaimed, "Look! A motor boat!" A moment later, she said, "TWO motor boats!!" She was right... and the second boat was a police boat apparently pursuing the first motor boat. We'll probably never know why the police were after the boat ... we'll just chalk it up to one of life's mysteries.
Once we arrived on the island, we quickly adapted to island time. There's a sense of ease on the island that we really enjoy. Things are quieter (until our kids arrive, that is) and slower paced. Even though Whidbey is only a 15-minute boat ride away, it feels quite remote in many ways.
The kids had a marvelous time running around Eric's parents' big yard while Eric addressed the TV/connectivity issues addressed. There is a grassy slope that Conor loves to scoot and roll down. (This is why we pack many changes of clothes!). He was covered in grass stains and dirt, but was so happy. It was great to see the kids running around the yard, pink cheeked, happy, and giggling. They took turns chasing each other and being the leader up the hill.
That afternoon, all six of us all packed up and headed to the local health club for a dip in the saltwater pool. We had a blast splashing and swimming to our hearts content. Annika proved what a fish she really is; she was here and there (always with an adult close by) and rarely needed any assistance. Conor had so much fun kicking around using a pool noodle for flotation. I don't think either of the kids stopped smiling the entire time we were in the pool. Three generations of Olsons had fun and emerged from the pool all pruny and tired.
On our way back to the house, we stopped in the meadow by the house and watch two deer nibble on some grass. I kicked myself for not bringing our camera with us, but was grateful that my phone's camera was close by. The deer kept an eye on me as I crept as close as possible for a quick picture.
Our final big project for the weekend was making bird feeders with Eric's mom. Annika's teachers helped the kids make feeders a few days before and kindly shared the recipe with me. We combined 4 c bird seed, 3/4 c flour, 1/2 c water, and 3 T karo syrup. After taking turns stirring the mixture, the kids, Eric's mom, and I pressed the concoction into cookies cutters, placed straws in the middles (future holes for the strings), and then baked the feeders at 170 degrees for an hour. Ta da! Instant (almost) bird seed buffet. After we got home yesterday, I hung the feeders (with the kids' guidance) on a big rhododendron next to our living room window. Come one, come all! I'm sure we'll be popular with neighborhood critters once word gets out about the feeders.
A special thanks to Eric's parents for hosting us this weekend ... we hope you enjoyed the visit, too!
This being a three-day weekend, it was the perfect opportunity to spend a night on Whidbey and soak up some island-paced fun. As we packed up the van Sunday morning, Eric looked at me and said, "Do you realize this is the first time in over 5 years that we've packed for the island and haven't packed the travel crib??" We felt so liberated and oddly underpacked.
We easily made the ferry and as we waited to leave the dock, Annika proclaimed, "Look! A motor boat!" A moment later, she said, "TWO motor boats!!" She was right... and the second boat was a police boat apparently pursuing the first motor boat. We'll probably never know why the police were after the boat ... we'll just chalk it up to one of life's mysteries.
Once we arrived on the island, we quickly adapted to island time. There's a sense of ease on the island that we really enjoy. Things are quieter (until our kids arrive, that is) and slower paced. Even though Whidbey is only a 15-minute boat ride away, it feels quite remote in many ways.
The kids had a marvelous time running around Eric's parents' big yard while Eric addressed the TV/connectivity issues addressed. There is a grassy slope that Conor loves to scoot and roll down. (This is why we pack many changes of clothes!). He was covered in grass stains and dirt, but was so happy. It was great to see the kids running around the yard, pink cheeked, happy, and giggling. They took turns chasing each other and being the leader up the hill.
That afternoon, all six of us all packed up and headed to the local health club for a dip in the saltwater pool. We had a blast splashing and swimming to our hearts content. Annika proved what a fish she really is; she was here and there (always with an adult close by) and rarely needed any assistance. Conor had so much fun kicking around using a pool noodle for flotation. I don't think either of the kids stopped smiling the entire time we were in the pool. Three generations of Olsons had fun and emerged from the pool all pruny and tired.
On our way back to the house, we stopped in the meadow by the house and watch two deer nibble on some grass. I kicked myself for not bringing our camera with us, but was grateful that my phone's camera was close by. The deer kept an eye on me as I crept as close as possible for a quick picture.
Our final big project for the weekend was making bird feeders with Eric's mom. Annika's teachers helped the kids make feeders a few days before and kindly shared the recipe with me. We combined 4 c bird seed, 3/4 c flour, 1/2 c water, and 3 T karo syrup. After taking turns stirring the mixture, the kids, Eric's mom, and I pressed the concoction into cookies cutters, placed straws in the middles (future holes for the strings), and then baked the feeders at 170 degrees for an hour. Ta da! Instant (almost) bird seed buffet. After we got home yesterday, I hung the feeders (with the kids' guidance) on a big rhododendron next to our living room window. Come one, come all! I'm sure we'll be popular with neighborhood critters once word gets out about the feeders.
A special thanks to Eric's parents for hosting us this weekend ... we hope you enjoyed the visit, too!
 |
| Pink-cheek Annika |
 |
| Pink-cheek Conor |
 |
| Oh deer! |
Friday, February 8, 2013
Antici......pation
Our kids dress up in random outfits almost daily. Sometimes they are royalty, other times they are on a picnic adventure. This day, they were preparing for a huge snow storm. Their play was interrupted by the fact I put something in the oven and they wanted to watch its progress. They were just so darned cute that I couldn't help but snap some pictures.
I loved how they were in their jammies, as well as snow boots, hats, gloves, scarves, and parkas ... all while happily seated on stools parked in front of the oven.


I loved how they were in their jammies, as well as snow boots, hats, gloves, scarves, and parkas ... all while happily seated on stools parked in front of the oven.


Subscribe to:
Posts (Atom)