Monday, October 22, 2012

My Birthday

This weekend, I started the last year of my 30s. Yup.... I'm 39, or as Annika kindly told me, I'm OLD!!

Old people, like me, tend to prefer quite celebrations instead of partying 'til dawn birthday shin-digs. We've been go-go-going so much lately that a quiet day of doing very little sounded like an ideal way to spend my birthday. I barely lifted a finger all day, which was a huge treat and got lots of quality time with Eric and the kids.

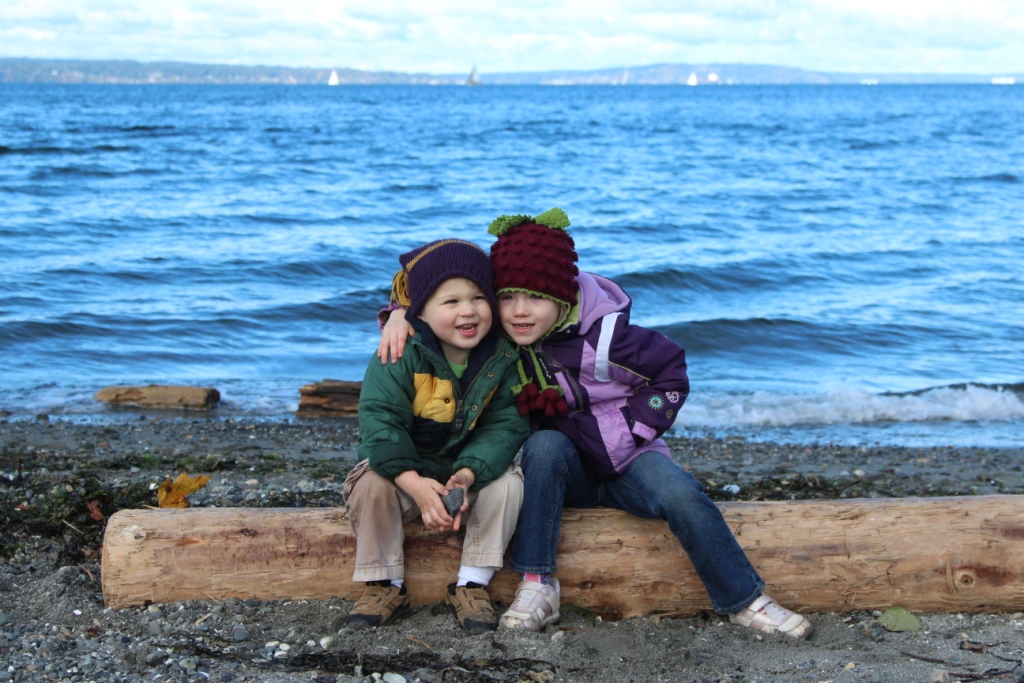
Eric was starting to get sick, so while he took a little nap, I took the the kids to Carkeek Park so they could play and I could practice my photography skills. Wind = fast moving clouds = constantly changing lighting = freaking hard!! (but I digress...)

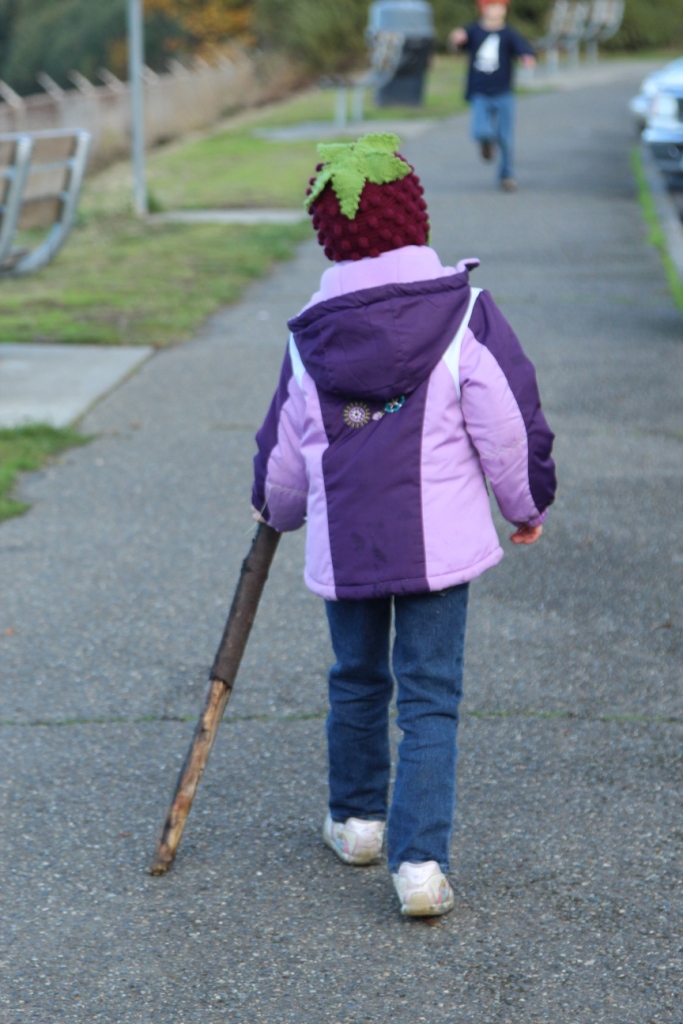
There were only two other people on the beach when we arrived, which was great. The kids were thrilled to throw rocks in the water, run after seagulls, find walking sticks, and relocate the driftwood (good thing the beach has interior designers). The sky was an incredible blue and the whipping wind meant there were lots of sailboats on the water for us to watch. After exhausting the beach fun, we trekked up the stairs and spent some time at the play area working out any last bits of remaining energy. The kids (and I) had a blast!

After our Carkeek excursion, we went home for lunch (aka Dicks burgers),  nap/quiet time, and a low-key afternoon at home. My big accomplishment was taking the time to put the zipper in my Halloween dress.

Thanks to Eric, who made my birthday very special and relaxing. You're the BEST, Sweetie!!

Oh! And what did my amazing husband/kids give to me? A new tripod, remote for the camera, boot trees, and Sees candy. Now, just ask who played with the tripod and remote first? One hint ... it wasn't me. ;) 

Conor having fun at the beach

 
Throwin' rocks

Fixing the beach's feng shui

Good thing Annika was there to fix up the beach's decor

This was the closest I could get to having them both smiling
and looking in my general direction

Beautiful day at the beach

Annika pretending to be old with her walking stick
(she told me she was pretenting to be Aunt June ... my 99-year-old great aunt)

Conor: The king of the slide

Monday, October 8, 2012

Do you know the days of the week?

Some time ago, Annika learned a song at school that helps the kids learn the days of the week. Conor has started picking up on it and now is her backup singer.

I love listening to our kids sing; their sweet little voices make me smile from ear to ear. They sing with pure enthusiasm and verve.

For your listening pleasure ... the singing Olsons!

Sunday, October 7, 2012

When Double-Dipping Is a Good Thing

On Friday, I got an IM from Eric saying how someone brought Top Pot doughnuts to work and he had part of a maple bar. Now, if you know me, you know that I love the maple bars from Top Pot. They are scrumptious and the perfect balance between sweet and maple. So, I decided that making doughnuts this weekend was a definite must.

I originally planned on making the maple bars found in the Top Pot cook book, but didn't think I had bread flour (I wound up finding some later on) and definitely didn't have any ground mace. So, I went to my old faithful doughnut recipe from the Pioneer Woman (making a 1/2 recipe in the interest of our waistlines); instead of using the Pioneer Woman's glaze, I topped these round bits of yummy goodness with the maple glaze (double dipped!) from the Top Pot cook book. HEAVENLY!

Homemade Glazed Doughnuts (ala Pioneer Woman)

Doughnut Ingredients

  • 1-⅛ cup Whole Milk, Warm
  • ¼ cups Sugar
  • 2-¼ teaspoons (one Package) Instant Or Active Dry Yeast
  • 2 whole Large Eggs, Beaten
  • 1-¼ stick Unsalted Butter, melted
  • 4 cups All-purpose Flour
  • ¼ teaspoons Salt
  • Shortening (NOTE: I used canola oil)
Instructions
To Make the Dough:
  1. Make sure milk is nice and warm, but not overly hot.
  2. Add sugar to milk. Stir to dissolve.
  3. Add yeast into a small bowl.
  4. Pour milk/sugar mixture over yeast. Stir gently, then let sit for 10 minutes.
  5. Melt butter in separate bowl until butter is almost melted. Stir to finish melting so butter won’t be overly hot.
  6. Add beaten eggs to melted butter, stirring constantly to make sure the butter’s not too hot for the eggs.
  7. Add the egg/butter mixture to the bowl of an electric mixer fitted with the dough hook.
  8. With the mixer on 3 or medium-low speed, pour in the yeast mixture.
  9. Allow the dough hook to stir this mixture for a couple of minutes, making sure it’s thoroughly combined.
  10. With the mixer still going, add helpings of the flour mixture in 1/4 to 1/2 cup increments until all the flour is gone.
  11. Stop the mixer, scrape the bowl, then turn the mixer on the same speed for five whole minutes.
  12. After five minutes, stop the mixer and scrape the bottom of the bowl.
  13. Turn on the mixer for 30 seconds.
  14. Turn off the mixer and allow the dough to sit in the bowl undisturbed for 10 minutes.
  15. After 10 minutes, transfer dough to a lightly oiled bowl. Toss the dough to coat, then cover the bowl with plastic wrap and place straight in the fridge.
  16. Refrigerate dough for at least 8 hours, or overnight.
To Make the Doughnuts:
  1. Remove bowl from fridge and turn out dough onto a lightly floured surface.
  2. Roll out to 1/4 to 1/3-inch thickness.
  3. Using a 3-inch cutter, cut as many rounds as you can, then roll out remaining dough and cut as much as you can, etc.
  4. Cut holes out of each round using a 1 1/2-inch cutter.
  5. Place both doughnuts and holes on a floured baking sheet.
  6. Cover with large tea towel and place in a warm place in your kitchen; my kitchen is very drafty, so I have to briefly warm the griddle, then turn it off and set the sheets on top to keep warm.
  7. Allow doughnuts to rise undisturbed for at least 1 hour; 1 hour 15 minutes if necessary. Doughuts should be visibly puffier and appear to be airy.
To Fry the Doughnuts
  1. Heat plenty of vegetable shortening (NOTE: I use canola oil) in a large pot until the temperature reaches 375 to 380 degrees—do not let it get hotter than 380 degrees! 375 is ideal; keep the thermometer in the pan to continually monitor.
  2. One to two at a time, gently grab doughnuts and ease them into the hot oil. Allow them to cook 1 minute on each side (NOTE: I found chop sticks to be the ideal flipping tool); they will brown very quickly.
  3. Remove doughnuts from the oil with a slotted spoon (NOTE: I used a spider instead of a spoon), allowing all oil to drip off.
  4. Place doughnut immediately on several layers of paper towels. Count to five, then flip it over onto a clean part of the paper towels. Count to five, then flip it over again; the purpose, obviously, is to drain as much grease as possible before it soaks into the doughnut.
  5. Repeat with remaining doughnuts and holes. The holes will cook more quickly than the doughnuts; about 30 seconds per side. (NOTE: Doughnut holes are really hard to cook evenly on both sides because they definitely have an "up" side! Used the chop sticks to brown the 2nd sides more easily.)
  6. Allow doughnuts to slightly cool. (NOTE: I let them cool completely per the suggestion in the Top Pot cook book.)
Top Pot Maple Glaze
Ingredients
  • 4 1/2 c powdered sugar (sifted)
  • 1 1/2 tsp light corn syrup
  • 1/2 tsp salt
  • 1/2 tsp vanilla extract
  • 3/4 tsp maple extract (NOTE: After taking a taste, I decided a bit more maple was needed, so I bumped it up to 1 tsp.)
  • 1/3 c + 1 T hot water
Directions
  1. Place all ingredients in bowl and whisk until smooth. If too thick, add more hot water 1 tsp at a time.
  2. Dip cooled doughnuts into glaze. (NOTE: I double dipped after the first coating had a chance to dry for a minute or two)
  3. Let dry 10-15 minutes (unless you're Eric, who lets them dry 10-15 seconds) before eating.


Saturday, October 6, 2012

Our 2012 Pumpkin Patch Excursion

Each year, our family visits a small pumpkin patch/petting farm that is about 20 minutes away from our house. Eric and I even went there once before we had kids... back when we were young and not sleep depraved. :)

One of the draws for this location (aside from the fact it isn't overly far from our house) is it has farm animals in addition to pumpkins. They have a miniature horse, chickens galore, pigs, sheep, goats, a calf, peacocks (not exactly a farm animal...), ducks, and turtles (again, not so much in the farm category, but they are there).

Last night, I realized our run of amazing weather will probably come to an end before too much longer, which made today an ideal day to visit the pumpkin patch. Eric, in all his wisdom, pointed out how nasty parking was last year and how we should arrive as close to when the farm opened as possible (which for us, was about a half hour .. which is pretty good for our crew!). The weather was so gorgeous this morning that we didn't even need coats. No coats in Seattle in October??? What has the world come to?

We got an amazing parking spot and scurried right in. As we paid the entrance fee, the gal told us that some piglets were born the day before and we should make sure to peek in on them. I am so glad we did! The piglets (11 total) were adorable! As we ooh'd and ahh'd over the piglets, the mama pig slept like only a new mother can. She was exhausted and snoring loudly in case anyone missed the fact she had given birth 11 times over yesterday. (Either that or she has sleep apnea and needs a CPAP machine.)

We also got a chance to visit the farm's sheep. There were two kids that were absolutely precious. They hopped around like they were made of springs. Poor Annika and Conor just couldn't move slowly enough to keep the sheep from scrambling as they got near.

After feeding the chickens and turkeys, playing in the barn, and me trying to smuggle the precious calf of the barn and into our car (ok, that last part didn't really happen, but I sure considered it for a few moments), we headed off to the pumpkin patch to pick out which orange beauties we'd take home.

In previous years, we've waited until closer to Halloween to go to the pumpkin patch and found the fields to be rather picked over. This year, we went the 2nd weekend they were open (they're only open to the public during the weekends of October), we got to pick from a wonderful selection of pumpkins.


Eric and Annika walking toward the entrance


I'm not kidding (get it??) .. one of the cutest animals ever!


Cute little piggies!!
(Compare them to the size of the mama's hoof!!)

Conor trying to haul his pumpkin with him


Annika showing her pumpkin of choice


The kids decided they were too tired of walking,
so they hitched a ride with the pumpkins

Waiting for Daddy to pay for the pumpkins

All ready to head home

Monday, October 1, 2012

Mamas at Gas Works Park


Last Monday, the Mamas with Cameras met at Gas Works Park to learn how to shoot cityscapes, particularly during sunset at and night.

First of all, I cannot thank the group's leaders (Mary and Wenmei) for all that they've taught me about photography. They are very knowledgeable and have a great teaching method... not to mention, are incredibly talented photographers!

Now, on to the pictures...

We traipsed all over Gas Works Park, and in all honesty, there aren't many more wonderful places in Seattle for getting a variety of settings and backdrops. Up on the sundial offers amazing views of the Aurora Bridge and downtown Seattle. Down by the water offers a closer view of downtown and the watercraft that travel along Lake Union. I'd hoped we see a sea plane land, but had no such luck.
We learned how to catch the setting sun on the buildings and in the lake
Mary and Wenmei goofing around under the cement arches; we worked
on creating depth/tunneling by shooting under the repeating arches

Downtown Seattle & Lake Union
(shot from up on the sundial hill)

One tip was to switch our white balance setting over to Tungsten to better capture
the lights in the buildings ... if you switch too early, your pictures wind up too blue ... just like this!

The skyline shot with the white balance back on the cloudy setting... MUCH BETTER!

Downtown Seattle after the sun set a bit more
(the tungsten setting was a better fit this time)

Note to self: Don't try balancing the tripod on 2 legs!

My favorite shot of the night


Thursday, September 27, 2012

September Daring Bakers' Challenge: Empanadas

This month's baking challenge was interesting for me. I'm not quite sure why, but I never could really bring myself to getting into gear and completing the challenge. The challenge itself—empanadas—wasn't intimidating or even hard sounding, but it wasn't until tonight (aka when the blog post was due) that I got around to getting the silly thing done.

I decided to make a sweet empanada instead of a savory one; not really for any reason except that I like to make sweet things. Inspiration struck when I saw some apples from our deaf family friends, the Simons. (Back story: Our family and the Simon family have known each other FOREVER.... as in since the mid-60s, which is well before me, making it FOREVER ago.... like how I do that? Yeah, me, too!)

ANYWHO!

The Simons have a wonderful backyard apple orchard and they are kind enough to share their bounty with us each year. Most of the apples from their trees are turned into our family's applesauce supple. This year, they also became some apple/cranberry pies for our church's fall festival's pie booth. I had a few straggler apples, which sparked my theory that making an apple dessert empanada was the way to go, and I was right!

I found a recipe online and decided it was best to get into gear and make the darned thing. I had all of the ingredients on hand, which helped me decide which recipe to choose. While putting the empanada dough together, I realized that I've made a VERY similar dough in the past and it was courtesy of another very dear and longtime family friend (Mary Elzy); her dough was used to hug a mushroom concoction (sorry, the exact recipe is eluding me at the moment and I'm too tired to look for it) that was definitely in the savory department. That said, the dough similarities were striking.

The recipe recommended eating the empanadas warm, and being one who follows directions well, I did just that. They turned out to be quite a tasty treat and the absolute perfect size. I cut approximately 4-inch dough circles, which resulted in 3-4 bite empanadas. I equate them to a cake pop or cupcake ... just enough to give you a good taste, but without all of the guilt associated with a bigger dessert. :)

We were supposed to use one of the dough recipes provided by the challenge host, but I forgot that fact until right now.... WHOOPS!!! That's what I get for waiting until the 11th hour and being so tired!

Sweet Apple Empanadas
Patri of the blog, Asi Son Los Cosas, was our September 2012 Daring Bakers’ hostess and she decided to tempt us with one of her family’s favorite recipes for Empanadas! We were given two dough recipes to choose from and encouraged to fill our Empanadas as creatively as we wished!


Friday, September 21, 2012

It's not a crime scene ... it's just Whidbey

I just realized I never posted the rest of the pictures I took during our weekend on Whidbey a few weeks ago. My apologies for the delay, but just think how much more exciting these will be after waiting with such antici ..............pation!

On Sunday afternoon, the kids were getting a bit ... how shall we say ... energetic, so we ushered them outside to burn off some energy. Bestemor (aka Eric's mom) pulled out a container of sidewalk chalk so the kids could let their creativity spring forth.

I love little kid handwriting!

The kids asked me to draw their outlines, which I happily did.
At the end of the art session, the driveway looked quite a bit like a crime scene
with lots of chalk body outlines.
Fortunately, the chipper clothes that Annika drew on the bodies
made it a much more pleasant crime scene.


Annika putting the finishing touches on her artwork

Annika and Conor busy at work.
Annika "sneaking" up on Buster so she
could get his toy and throw it for him again

While the kids played, Eric and his dad (aka Bestefar)
did some projects around the house.

They even needed a ladder and scaffolding


Manly work, I tell ya!

Of course, the kids decided they needed to "help"
Conor trying to strong arm the wheelbarrow