Showing posts with label baking with children. Show all posts

Monday, April 8, 2019

Annika's Amazing Croissants

For quite a few weeks, Annika has talked about wanting to make croissants. I cannot lie ... I basically LOVE the fact she wanted to take on croissants. 

The issue ... ok, not issue, exactly .... the important thing to keep in mind is croissants are not a quick baking project. It isn't like the "Hey, Mom? Can we make cookies?" type of request that we can basically do at the drop of a hat. Laminated dough takes time. The ingredients have to be assembled, the dough has to rise, and then it has to be rolled, folded, rolled, folded, rolled, folded, chilled for 30 minutes (and repeat two more times). Typically, I like to make croissants over the course of a weekend; the dough is made, rises, and has its three rounds of rolling/folding on day 1. It spends the night in its plastic wrap sleeping bag in the fridge, and then day 2 is when we cut/shape the croissants, let them rise in their sauna, and then we bake them. 

Annika did a fantastic job! She was careful with her measurements and paying attention to the details. She listened well as I explained why certain things are done. As she beat the butter in the mixer, she proved (once again) that she's my girl by exclaiming how much she loves the smell of butter.


Annika adding the dry ingredients to the mixer

I'd like to throw out a huge bit of praise for Annika. She has been out of her cast for a smidge over a week, and was already battling dough with a rolling pin. That's not an easy task with two fully-functioning arms, and there she was persevering (Eric!!!) with one arm that wasn't quite up for that sort of task yet. Yes, I did help roll out the dough when she needed some assistance, but even that impressed me... she was willing to recognize when a helping hand was in order. (That's something I still struggle with. "I do it b'self!")

Rollin', rollin', just keep rollin'

After our third round of rolling and folding, we wrapped up the dough in plastic wrap and put it in the fridge for the night. Side note: I am SOOO glad I checked on the dough before I went to bed because it had enough carry-over heat that it continued to grow and it was HUUUUUGE! I knocked down the dough (TAKE THAT, dough) and put it back in the fridge ... with an extra layer of plastic around it just in case.

Sunday morning was rolling, cutting, shaping rising, baking, and (most importantly) EATING day!!!

We pulled out my marble slab (thank you to Eric's brother and sister-in-law for the heaviest-ever Christmas present!!), rolling pin, and croissant cutter (a special thanks to my brother and his co-worker for getting that amazing toy for me... still love it after all of these years!) and we got to work. After we rolled out the dough, I showed Annika how to use the croissant cutter, how to shape the rolls, and how we use a Hefty bag and bowl of hot water to create a croissant sauna.

Shaping the croissants

Annika and her croissant cutter super hero mask

Before long, the first batch of rolls was out of the oven (and that's when I realized we neglected to  put the egg wash on them ... whoops!) so I quickly brushed them with egg wash, popped 'em back in the oven and browned 'em up a bit more. Adapting is part of the baking game, people! :)

First batch out of the oven waiting for its forgotten egg wash

Annika with one of her finished croissants. SOOO yummy!!! 

Look at those flaky culinary masterpieces. Way to go, Annika!
Making something like croissants take a lot of patience and precision. Annika really showed how she's maturing by taking on a project like this. Sure, I had to encourage her to stick with it during the less exciting times here and there, but she really did a great job with this project. Very proud of our girl .... now I need to go ride our stationary bike 350,000 hours to work off the insane amount of croissant-shaped calories I've ingested since yesterday. 

Monday, April 27, 2015

April 2015 Daring Bakers' Challenge: Focaccia

This month's Daring Bakers' challenge was right up my alley: BREAD!! More specifically, we were challenged to make focaccia from scratch.

The timing for this challenge couldn't have been more perfect, considering my new addition to the book "Flour, Water, Salt, Yeast", which is ALL about bread making. Every recipe provided in this book yields two loaves of bread, and many recipes are adaptable, meaning you don't have to make the same kind of final product with both halves of the bread. So, I made bread by following the "Overnight White Bread" recipe, and made half of dough into a lovely artisan loaf and the other half into focaccia.

Conor helped me make the focaccia's dimples, and he was in charge of brushing the olive oil on the top of the bread... hence, we had uneven dimples and areas of oil slick on the bread, but it all worked out!

I topped the focaccia with parmesan cheese and salt... all four of us gave the bread our thumbs up. Definitely going to make it again!


For the month of April Rachael of pizzarossa and Sawsan of Chef in Disguise took us on a trip to Italy. They challenged us to try our hands at making focaccia from scratch

Sunday, December 15, 2013

Gingerbread Decorating

The Christmas season is in full gear and we Olsons are doing our best to keep up. Our tree is trimmed, our halls are decked, and our children are beyond excited for the big day. Annika and Conor practically overflow with anticipation each morning as they wait to discover what our house nissen left in the Advent calendar each night.

It wouldn't be the holidays without a wee bit of baking, too! One of our projects this week was baking and decorating gingerbread cookies. We broke it into a two-day project, which probably preserved a little bit of my remaining sanity. I made the dough (solo... just to avoid any missed ingredients... oh, say like the sugar in a cheesecake ... not that I would EVER admit to doing that! Staci, I still owe you a new cheesecake, by the way!) and the kids helped cut out and bake the cookies, which they had a lot of fun doing. Two days later (I made gingerbread and krumkake for a work potluck, so the gingerbread cookies had to wait), we pulled out the decorating tools, whipped up the royal icing, and went to work making our masterpieces.

For those of you not familiar with using royal icing to decorate cookies, typically, you outline the cookie with a thicker version of the icing to act as an icing parameter. Then, you flood the inside of the parameter with a thinner version of the royal icing. Boy, did Conor jump in with both feet when the flooding part was to begin. That little boy flooded to within a inch of his life... and a few inches past the life of his cookie. He flooded, added sprinkles, flooded, added more sprinkles (because the first ones were completely covered), and repeat. He had a marvelous time!!

Annika took the "less is more" approach to her cookie. She was very particular in how her cookie evolved, and made sure to include its separate pieces of attire... which kind of got lost in translation because the royal icing was all white, so her cookie had white sleeves, white shirt, white pants... Annika showed great restraint while decorating her cookie and was thrilled with her final results.

All-in-all, both kiddos (and their mama) had a great time decorating cookies and spreading a bit more holiday cheer with each other!


Conor flooding his gingerbread cookie

Royal icing overboard!

Annika making sure her cookie is runway ready

Christmas tree buttons are at the height of fashion on the North Pole cat walks

More flooding! (Don't let this kid near Hoover Dam!)

Happy gingerbread man

Conor sporting two Santa headbands... one is never enough!

Happy girl!

My snowflake cookie

"Oh no!!" (He knows what's about to happen!)
Snowflakes, gingerbread man, and Rudolph

Ta da!

Thursday, May 9, 2013

My little helper

Last night, I made a batch of brownies. Almost immediately, Annika rushed up to offer her help. She was bummed that I'd already cracked the eggs, but was mollified when I let her finish whisking them in and let her add the flour.

Both of our kids are amazing helpers when it comes to baking projects. They love to put the ingredients in the mixing bowl, crack the eggs (always an adventure), and stir everything together.

More than that, though, they like to lick the spatula/beaters/whisk when all is said and done.

Our little chocolate fanatic

Wednesday, March 27, 2013

March 2013 Daring Bakers Challenge

It's baking challenge reveal day! And, boy, am I glad that I have a reminder on my phone's calendar to keep me on top of things. I would have completely forgotten to post about this month's Daring Bakers challenge had it not just beeped at me.

This month, we were tasked with incorporating at least one vegetable into a dessert. As soon as I read the challenge description, I knew what I was going to make. When I was a kid, my mom used to make a really yummy chocolate cake that had zucchini tucked inside for added moisture.

I called my mom and asked for the recipe. When she called me back with it, I was folding laundry and really didn't have any writing implements at hand. I ran to the kids' art bin and found a piece of brown construction paper and a red crayon. Perfect! I scribbled down the recipe and half considered keeping it in that format, but decided it would be more prudent to write it out in longhand for future use. Darn you, logic, you won again!

This cake's origins are a bit unclear. My mom couldn't recall if she got the recipe from her friend Mary or if her friend Mary gave the recipe to her. Either way, it is now in my possession and because my mom gave it to me, I'm taking over the naming rights.

I baked the cake this weekend. Much to our niece Emily's amazement, the kids and I had this baby out of the oven and on a cooling rack by 7:30 AM! (Welcome to life with young children!)

I figured we could use this cake for Conor's actual birthday (tomorrow!!!) and then the fancier cake for his family gathering on Sunday (aka Easter). Because we're saving the cake until tomorrow, please imagine the cake below is sliced and has a lovely dusting of powdered sugar on top!

I almost forgot to take a picture of the cake, so had to unwrap it from its Saran and foil coverings ... hence the less than grand picture.


Nana's Chocolate Zucchini Cake
 
Ingredients
  • 1 c. brown sugar
  • ½ c. white sugar
  • ½ c. butter
  • ½ c. vegetable oil
  • 3 eggs
  • 1 tsp. vanilla
  • ½ c. buttermilk
  • 2 ½ c. flour
  • ½ tsp. all spice
  • ½ tsp. cinnamon
  • ¼ tsp. ground clove
  • ½ tsp. salt
  • 2 tsp. baking soda
  • 4 T. cocoa powder
  • 2 zucchini (grated = 2 c.)
  • 1 c. chocolate chips
Directions
  1. Preheat oven to 325F.
  2. In mixer bowl, cream together sugars, butter, and oil.
  3. Add eggs, vanilla, and buttermilk.
  4. Add flour, all spice, cinnamon, clove, salt, baking soda, and cocoa powder.
  5. Fold in zucchini.
  6. Pour batter into greased bundt pan.
  7. Sprinkle chocolate chips on top of batter.
  8. Bake at 325 for 45 minutes.
  9. Cool in pan for 10 minutes, then invert cake onto cooling rack.
  10. Sift powdered sugar over cake before slicing.
 Ruth from Makey-Cakey was our March 2013 Daring Bakers’ challenge host. She encouraged us all to get experimental in the kitchen and sneak some hidden veggies into our baking, with surprising and delicious results!

  1. 

Wednesday, March 6, 2013

Salted Caramel Brownies

A few weeks ago, Eric ran across a recipe for salted caramel brownies. Ironically, it was posted on one of my favorite food blogs (Smitten Kitchen). Of course, seeing the recipe made me want to give it a go, but time was a bit short, so I didn't quite get around to it. Part of the reason for the delay was finding time to not only make the brownies, but also the homemade salted caramel that goes into them.

Last night, however, was the night. Annika had a play date at her friend Valeria's house, which gave me a bit of extra time to work on the brownies. I made the caramel and then picked up Annika while it cooled ... multi-tasking, baby!!

Because I made a double batch (knowing I'd take the brownies to work) I used a 9x13 pan instead of the recommended 8x8 pan. I quickly realized that putting the caramel on a plate to cool wasn't going to be an ideal situation; the risk of a "caramel overboard" situation was pretty great; I had visions of caramel slipping off of the plate and all over the freezer ... I also had visions of me chiseling the caramel out of the freezer ... and snacking on it. (How sad is that???) To avoid that embarrassing (yet probably fairly tasty) scenario, I opted to verrrrrrry carefully slide the parchment from the plate to a pie dish; the extra-high sides were exactly what I needed.  Glad I went with plan B!

After picking up Annika and putting Conor to bed, Annika and I made the brownie batter together. She had a great time stirring the ingredients as I dumped them into the bowl. That said, her favorite part was licking the spatula when all was said and done! :)

A few things I noticed, greasing the parchment that the caramel cools on is a must. I lined my baking pan with a two-way of (greased) parchment paper and am very glad that I did. The brownies took about 15-20 minutes longer to bake than the original recipe called for, but that probably has something to do with the fact I doubled the recipe and had a much bigger pan in the oven. Finally, when sprinkling the remaining caramel pieces on top of the brownie batter, don't put the pieces overly close to the edge ... they created caramel crunch and enveloped the edges of the parchment a bit.

Oh my, but are these babies divine! I mean DEEEE-VINE!!! They are gooey and not too sweet. I'm not normally a huge salted caramel fan, but because the salt wasn't overpowering, I'm giving this recipe a huge thumbs up.

If you decide to try the recipe, heed the advice from Smitten Kitchen.... freeze the brownies for a bit before trying to cut them. I tried cutting them this morning without freezing them and it was fairly tricky. After 10-15 minutes in the freezer, they cut much more easily.


Salted Caramel Brownies (courtesy of Smitten Kitchen)

Caramel
1/2 cup granulated sugar
4 tablespoons unsalted butter (or salted, but then ease up on the sea salt)
Heaped 1/4 teaspoon flaky sea salt (or 1/8 teaspoon table salt, more to taste)
3 tablespoons heavy cream

Brownie
3 ounces (85 grams) unsweetened chocolate, roughly chopped
1 stick (4 ounces or 115 grams) unsalted butter, plus extra for pan
1 cup (200 grams) granulated sugar
2 large eggs
1 teaspoon (5 ml) vanilla extract
Heaped 1/4 teaspoon flaky sea salt or 1/8 teaspoon table salt
2/3 cup (85 grams) all-purpose flour

Make caramel: Set a square of parchment paper over a medium-sized plate. Lightly butter or coat the parchment with a spray oil, just as an added security measure.

In a medium, dry saucepan over medium-high heat, melt your sugar; this will take about 5 minutes, stirring if necessary to break up large chunks. By the time it is all melted, if should be a nice copper color; if not, cook until it is. Remove from heat and stir in butter. It may not incorporate entirely but do your best. Stir in cream and salt and return saucepan to the stove over medium-high heat, bringing it back to a simmer and melted again any sugar that solidified. Cook bubbling caramel for a few minutes more, until it is a shade darker.

Pour out onto parchment-covered plate and transfer plate to your freezer. Freeze until solidified, which can take anywhere from 20 to 30 minutes in a decent freezer to 40 minutes in my terrible one.

Meanwhile, or when your caramel is almost firm, make your brownies: Heat oven to 350°F. Line an 8×8-inch square baking pan with parchment, extending it up two sides. Butter the parchment or spray it with a nonstick cooking spray.

In a medium heatproof bowl over gently simmering water, melt chocolate and butter together until only a couple unmelted bits remain. Off the heat, stir until smooth and fully melted. You can also do this in the microwave in 30-second bursts, stirring between each. Whisk in sugar, then eggs, one at a time, then vanilla and salt. Stir in flour with a spoon or flexible spatula.

Assemble brownies: When caramel is firm, remove it from the freezer and chop it into rough 1-inch squares. Gently fold all but a small amount of caramel bits into batter. Scrape batter into prepared pan, spreading until mostly even. Scatter remaining caramel bits on top. Bake in heated oven for 30 minutes, until a toothpick inserted into the center comes out clean.

Cool thoroughly — a process that can be hastened in the freezer, which will also produce cleaner cuts — and cut into squares or other desired shapes.

Monday, December 3, 2012

Baking Christmas Cookies

My co-workers have not-so-subtly been hinting that it has been too long since I last brought in homemade treats. That hinting combined with the fact it is the Christmas season meant it was time to bake this weekend!! I pulled out my handy-dandy (albeit slowly dying) Kitchen Aid yesterday and decided to whip up some Christmas-themed shortbread cookies.

The night before as I was in bed falling asleep, I wondered if it would work to make two colors of shortbread dough, layer them, roll them into a log, chill the log, and then slice the log and have swirled cookies. (Yes, that is what I think about as I fall asleep ... I think it is a sickness! Maybe should look into a local chapter of Bakers Anonymous ... I wonder if they'd let me bring homemade treats to the meetings!)

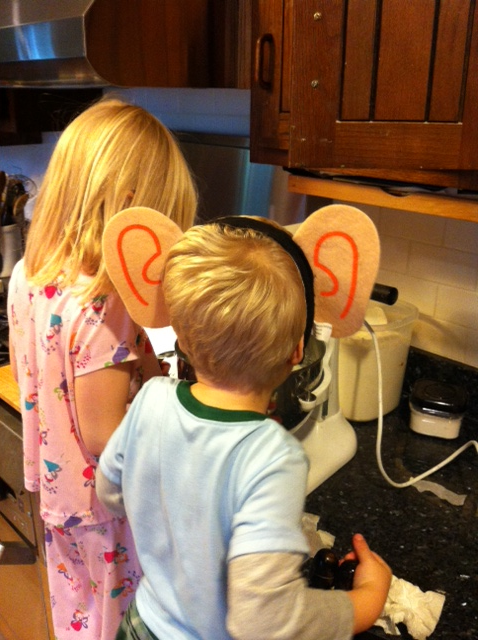
As soon as I pulled the mixer out of the cupboard, Conor was running through the kitchen shouting "I want to help! I want to help!!" (That boy is my little baking apprentice through and through!) So, the kids hauled chairs from the table over to my baking station and helped me whip up the dough. (Note to self, don't let them unwrap the butter and put it into the mixer bowl before checking for leftover paper.)

After the dough was done, the kids went back to playing, which worked out nicely for the coloring, layering, rolling aspects of the project. I was rather nervous about the cookies' final appearance; would baking negatively impact the colors? Happily, I learned that it didn't! The cookies are adorably Christmasy.

Conor wore the elf ears as ear plugs ... hey, he thinks it works, so we go with it

Watching the mixer do its thing; the kids know they have to keep their
hands back, so Annika holds the bowl handle while Conor covers his ears... I
guess the elf ears didn't work after all

Ready for baking!
(Note the holes in a few of the cookies ... that's where
I dug out the butter wrapper remnants)